Readers,
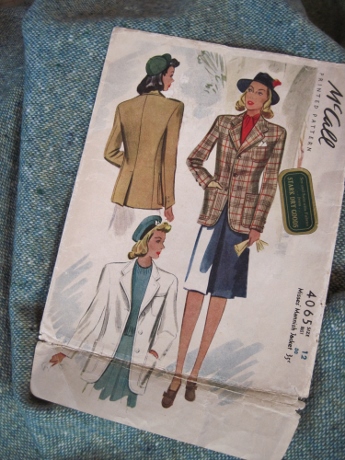
Here is my 1941 McCall “mannish jacket” today, as I continue to follow Kenneth King’s Smart Tailoring DVD set’s “old school” methods:

It will take longer to describe what I did than it took to do the actual work.
I finally got to sew the back to the fronts. Yay!
Kenneth demonstrates steam-pressing and gently stretching, rather than clipping, the curve in the back seam allowances before stitching them to the fronts.
My jacket’s back seam allowances didn’t need clipping, or pressing and stretching, to conform nicely to the fronts, so I skipped this step.
But it was very helpful to know the purpose behind the step:
In tailoring, you really want to keep the seam allowances intact as much as possible, especially if you have a wide seam back there so you can make the back larger if you need to.
Even though I’m not following this step in this project, I am still internalizing the reasoning. Thinking ahead, making steps reversible where possible, extending the productive life of a garment all contribute to an approach that enriches the sewing and the sewer.
Next, Kenneth demonstrates hemming the jacket. You lay in a little tailors’ canvas–bias cut, to conform to a curve– for support and weight.


You fold up the hem, and do a nifty, almost invisible hand stitch to hold it in place.

Kenneth doesn’t give this hand stitch a name, and I’m going to resist the impulse to look for it in my sewing library. Seeing hand stitches on video is much more helpful than seeing still photos. All I can do is give some idea of the sequence.


Although I didn’t break any speed records, I did this stitch competently after several minutes of practice. It takes me several times watching these hand-sewing sequences to notice something as simple as how to hold the fabric in my left hand while my right hand wields the needle.


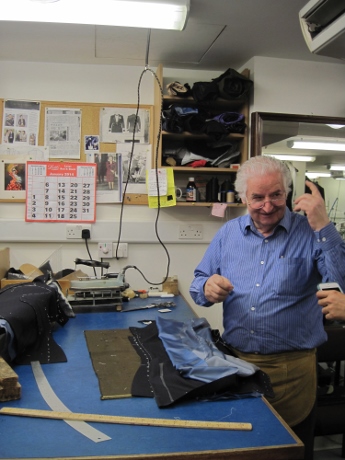
In July when I attend Kenneth’s class you can be sure I’ll be scrutinizing how he holds the fabric for control and speed in hand stitching. When I got to visit the workrooms of Savile Row tailors last year I was in awe of their dexterity.
With a few deft folds, presses, and stitches the vent is neatly finished.


This was the first time I’ve sewn the side seams of a jacket or coat leaving the shoulder seams open for now.
It’s also the first time I’ve sewn the lapels without attaching the collar at the same time.
These firsts made me realize that I’ve been schooled in a certain construction sequence for jackets but that it’s not the only one.
It’s really interesting to try another method and compare the results.
And actually, now that I think about it, it’s not only the results of this “old school” method that interest me. It’s the process.
Wouldn’t it be great, I’m thinking, if I enjoyed both the process of tailoring and the result?
Yes!
Coming up next: lining.
Related Posts