Readers,
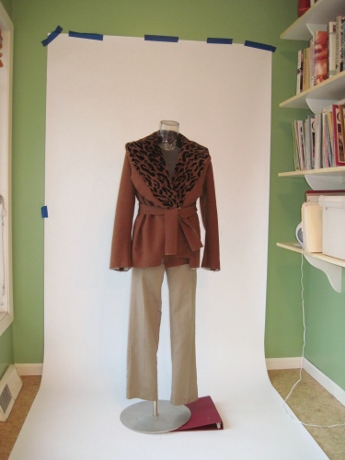
This morning I couldn’t resist pinning the sleeves I finished yesterday onto my jacket, just to get a preview.

Last week I was gratified to sew the shoulder seams and hand-stitch the collar to the neckline. For the first time I was able to see my jacket as a three-dimensional garment and not just a flat project.
With the sleeves pinned on, I was able to imagine my jacket finished. Yay!
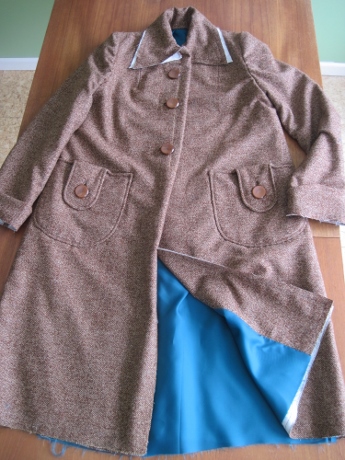
The most recent segment I completed from Kenneth King’s Smart Tailoring DVD set, “Construct the Sleeve–Old School,” was pretty easy. Kenneth walks you through neatly finishing a vented sleeve. There was no single step that was hard to understand or do.

Nevertheless, I took the precaution of reviewing mitering the overlap by making a paper model, which was easy, quick, fun, and a confidence-builder. Making mistakes on paper is a lot better than in fabric.


I did stray from the Smart Tailoring path for one step. Kenneth interfaces the 1 1/2 inch-deep sleeve hems with 2 1/2 inch-wide wigan–and guess what? I forgot to lay in a supply. What could serve as a substitute?
Searching my stash, I came up empty-handed. I did not have any woven that was both light and crisp except organza, which seemed too light for this medium-weight wool tweed.
After consulting some tailoring sources (tick, tick, tick–down the research rabbit hole) I said to myself, It’s time to move on. I’m using bias-cut tailors’ canvas.

I’ve done this before–I mean, used bias-cut tailors’ canvas to interface sleeve hems–without dire results. The bias cut means the canvas can conform to curves more smoothly than a lengthwise or crosswise grain can. That’s good, right? My sleeve hem definitely has a curve.

I went back to Kenneth’s segment about tailoring supplies, where he mentions wigan:
This is used to interface cuffs; it’s used sometimes to interface hems, because a cuff on a tailored jacket sits at a slight angle, so it is a slight bias. You don’t want that edge to stretch over time. So interfacing with wigan is a very thin, lengthwise-grain way of staying the cuff.
Hmm. Okay, the idea of staying the cuff with a lengthwise grain makes sense. But Kenneth’s sleeve looked awfully straight across to me. I did not see a curve anything like my sleeve’s to contend with. So he could lay down that wigan along his sleeve hem and it fit right in. Would wigan have worked as well for my sleeve? Call me dubious.

I will add using wigan to my list of questions to ask at Kenneth’s two-day tailoring details class in Cleveland in July.
It just occurred to me that this sleeve segment of Smart Tailoring was so straightforward that I had to work pretty hard to find something to cavil about.

Time, again, to move on. Next will be installing the sleeve lining.

Related Posts

A real jacket is being born! Funny about the wigan, I had just read somewhere that it was hard to come by. I’m anxious to see the source for it. I’m getting very excited about your jacket. It’s looking wonderful! You’re getting nearer to the finish line.