I’ve started watching Smart Tailoring all over again, pausing the video every couple of minutes to jot down notes. This DVD set is packed with information and I don’t want to miss a thing.
Kenneth King is showing a sleeve with a vent made with “old school” techniques.
Kenneth King starts Smart Tailoring by saying
“I’m going to be talking about ‘old school’ and ‘new school’. ‘Old school’ as I define it, is the classic tailoring techniques of the European tailors and a lot of the old American tailors. ‘New school’ is a method that I developed myself because I needed to be able to make a really well constructed garment that was beautifully shaped and held its line indefinitely.”
Last year I got quite a good look at the ultimate in “old school” techniques: the bespoke tailoring of London’s Savile Row. It’s understated, elegant–and with so much fitting and hand stitching, incredibly labor-intensive to produce and expensive to buy.
The home of bespoke tailoring.
Thankfully, Kenneth King’s version of “old school” doesn’t require a seven-year apprenticeship.
On my visit to Henry Poole, one of Savile Row’s most prestigious establishments, I got to see tailors in action.
And his “new school” version is not of the “make a jacket in a day” variety. In both cases he employs techniques that give great and long-lasting results.
Kenneth goes on to say
The benefit of tailoring is that you can have it exactly as you wish. You can combine the ‘new school’ and ‘old school’ techniques; you can change fabrics; you can change styles to reflect the trends and to reflect your taste–so you can have it your own way.
The techniques of this most staid and tradition-bound area of garment-making can be the springboard for great freedom and originality. Isn’t that interesting?
After the introduction we move on to the section on materials.
“The success of the ‘old school’ and ‘new school’ methods is dependent on the understructure,” says Kenneth, so a description of tailoring canvases is in order.
The purpose of the canvas is to give an idealized shape over which the fabric drapes. Now, some people say when they hear ‘tailoring’ they think tailoring is always hard and stiff, but you can start with a very, very light canvas.
Interfacings, underlinings, linings–decisions, decisions! Samples I made for my 1936 McCall jacket.
He shows five canvases ranging from very light to very heavy. What I found especially interesting was that a canvas might be supple or stiff in all directions, or it might be supple lengthwise but stiff crosswise. There has to be a reason, and a right application, for each of these canvases. I still have a lot to learn about which canvas to use when.
Two tailoring canvases carried by Treadle Yard Goods, in St. Paul, Minnesota. Stores in Columbus, Ohio don’t carry canvas. I will mail order it.
I have a bolt of fusible tailoring canvas, but I think it wouldn’t meet with Kenneth’s approval. He describes the fashion fabric as draping over the understructure, not being fused to it, which would likely change the fabric’s hand, and not in a good way.
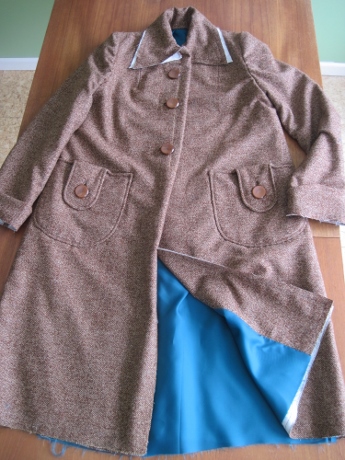
It so happens that today I’m wearing a jacket I made using this fusible canvas. It’s worked great for ten years, but I assumed the risk of its possibly coming loose from the fashion fabric.
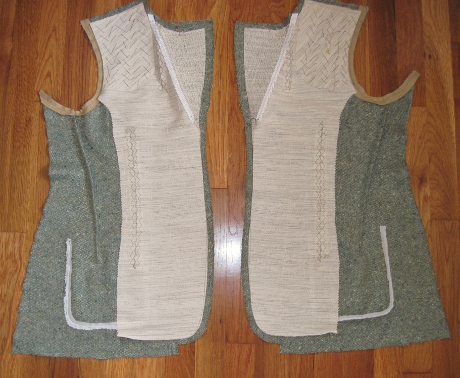
I used fusible canvas in the fronts of this jacket. This is the 1941 pattern I will sew again for this Smart Tailoring project.
If I had a tailoring business I would worry about using this fusible for a customer because I couldn’t be sure the garment would keep its shape indefinitely. I’ll stick with sew-in canvas.
I won’t be using fusible canvas in my Smart Tailoring projects. (Could the adhesive be removed so I could use this as a sew-in canvas? Has someone already tried this?)
Kenneth doesn’t give sources for the tailoring supplies he describes, so I asked members on the PatternReview.com forum. They enthusiastically recommended B. Black & Sons in Los Angeles.
Next are materials for collars:
Collar canvas, which is malleable when steam-pressed but stiff when it cools, used in “old school” tailoring to interface the under collar.
Collar felt, used for the under collar in the old school. Since felt is a nonwoven and so has no grain, an under collar can be cut from it in one piece, avoiding the bulk of a center back seam. Collar felt comes in just a few, neutral colors.
I bought this collar felt, with collar canvas already attached, about ten years ago for my UFO, the dreaded sport coat project. Should I take out the stitching and remove the canvas?
Collar melton, a thick coating that can substitute for collar felt. It has a grain, so the under collar must be cut in two pieces on the bias and sewn at the center back. So you do get a seam, which means dealing with the bulk. But unlike collar felt, collar melton comes in great colors. And it can be fun to turn up your collar and reveal the surprising contrast of a cheery red under collar. In an aside, Kenneth adds “I think it looks fabulous.” I find myself smiling back and agreeing.
Next come
pocketing, which is glazed on one side so it doesn’t stick to the fashion fabric
silk organza, for staying armholes and edges in “new school” tailoring, and
cotton muslin, for various old and new school applications like back stays.
Kenneth weighs in on the debate over how to treat your fashion fabric before cutting out the pieces. I’ve read (and followed) some elaborate directions for wetting wool fabrics and drying with towels, pressing with lots of steam, and all but saying a prayer to the patron saint of tailors to prepare yardage. I always wondered whether taking this much trouble was necessary or even effective.
The fabric I’m going to use has a few flaws, but I can work around them.
Kenneth’s advice is simply to leave pretreatments to the pros. When he buys fabrics he takes them straight to the dry cleaners. “I have them steamed before I put them in my stash so they’re what’s called ‘needle ready’ when I need them.”
Now that’s being prepared. That’s also being committed to using your fabric rather than having it languish in the land of sewing dreams. Dry cleaning ain’t cheap.
I had steam-pressed the wool tweed for my practice run with my little Rowenta iron and called it a day.
Full steam ahead!
Then I had two thoughts:
I said I was going to follow Smart Tailoring. Smart Tailoring says to have a dry cleaner steam press this.
My fabric didn’t come to me from a store but from the Textile Center of Minnesota’s annual fundraiser (“the world’s largest textile garage sale”) from somebody else’s stash.
The colors in this tweed say “vintage” to me–like actual 1950s shades. The fabric had been folded and exposed to light for so long (decades?) that a fade line ran lengthwise down the middle. (In the warehouse lighting and the frenzy of the sale I didn’t notice or care.) Then I began to wonder how clean this fabric was. Okay. I surrendered.
Like a faint jet trail, a fade line marks the center of my vintage tweed. Luckily, I have an extra yard.
Tuesday I brought my yardage to the dry cleaner for both cleaning and steam-pressing. For the three yards the bill was an eyebrow-raising $34.39.
Or was I naive?
For the equivalent of a dozen such dry cleaners’ bills I could buy a Reliable i300 ironing station and happily steam press my own yardage. I foresee well over a dozen tailoring projects in my future. Two dozen, easy.
Three dozen?
Hmm.
Continuing the roundup Kenneth describes the supporting roles of
the cuff interfacing called wigan
shoulder pads
double-fold bias tape, and
stay tape or twill tape.
An abundance of twill tape in my stash.
He concludes with advice about basting thread.
I find myself mulling over a 750-yard spool of white basting thread on the B. Black & Sons website. How long would it take me before I said to myself–“Whoops, I’m running low! Better buy another one soon!”
I wonder. Maybe not as long as I think.
Because Kenneth wraps up this section by saying,
For those who really don’t like hand-stitching, once you appreciate the value that hand-stitching in the form of thread-basting gives to new school and old school tailoring, you’ll change your mind. When you’re basting the layers together, everything stays exactly where you need it so you can do the different operations.
To me that’s just another way of saying that thread-basting will give me more control over my work.
It is not fun when you’re deep in a tailoring project to lose control and make an irreversible mistake.
A sample I sewed. Luckily, I made the mistake here–not on my jacket.
Control would be very nice. So would fun.
Imagine that.
Maybe I’ll go ahead and buy two spools of that basting thread.
You will LOVE that basting thread! (yes, I did buy two spools) 🙂
Paula DeGrandsays
Ambitious!
Waist Suppressorsays
Steinlauf and Stoller is an excellent source of tailoring materials. http://www.steinlaufandstoller.com/ So is a recent discovery, Bias Bespoke. https://www.etsy.com/shop/BiasBespoke I recently bought Italian basting cotton from them, among other things. They have a variety of canvasses. Lichtenstein on Delancey Street sells wigan.
In March, a new edition of the classic book on tailoring by Roberto Cabrera is due out. I can’t wait for the reviews. Unfortunately, it’s quite expensive.
“‘New school’ is a method that I developed myself because I needed to be able to make a really well constructed garment that was beautifully shaped and held its line indefinitely.”
So is he suggesting that old school methods don’t produce beautifully-shaped, long-lasting garments? Arrogant. If he’d said he couldn’t as a business person devote the same amount of time to that level of work because he couldn’t charge for it, I’d be more inclined to agree.
Your jacket looks nice, but a block-fused tailored jacket won’t look the same way as a jacket with structure made by hand, wholly or partially; the jacket can’t be steamed and molded as real hymo and horsehair can. I don’t think the glue can be removed from the canvas. I’d sell it or use it as interfacing for accessories if it’s strong enough.
Paula DeGrandsays
Thank you for mentioning these great sources of materials and inspiration. I was just looking at the Steinlauf and Stoller website and could find just one canvas offered online. (I’m sure they have a wide choice of tailoring canvases in the store, which I’ll check out the next time I’m in New York.)
Bias Bespoke looks great. I’ll keep them in mind for sure.
I have marked my calendar for Cabrera’s book. I’ll be interested to see how clear the construction processes are to a nonprofessional like me.
I would not presume to speak for Kenneth King, but feel safe in saying that any technique he uses in his work and teaches to FIT students, professional and amateur sewers has to meet a high standard. In the introduction of his book Designer Techniques: Couture Tips for Home Sewing (1996) he writes
I am one of the fortunate few who is able to make my livelihood from the vocation that is also my passion. Since I am deeply interested in what I do, and since I have chosen to sell in a very demanding market, I am called upon to create superbly finished and well-performing products that are also profit-generating. This is most important. I have also been forced to conceive techniques that will give me the proper finish while making good use of my time.
The Davide Taub jacket is gorgeous, marvelous! I see he won a Golden Shears award a few years back. What remarkable skill and eye. Oh, I just noticed he’s head cutter at Gieves and Hawkes. Perhaps I had a glimpse of him or his work last year. I’ve just become the newest subscriber to his blog.
I should note that in the Fashion and Textile Museum class I took in London last year we were sent to look at Sir Thom Baker, http://tombakerlondon.com/, to try to determine his “house style,” and there’s nothing staid about his work!
I agree with you about my jacket. Although it does look fine, I have a different feeling about it knowing the fabric is fused to that canvas and can’t move. If I keep that fusible it won’t be used for garments.
Margueritesays
My two cents….you already are displaying tremendous skill and patience….why not splurge and work on some fabulous fabric? Or is the tweed here just a practice piece? Although I’m thinking that anything you do will be gorgeous so why not go for broke on the fashion fabric? I speak from experience here. As many times my best work was done on my bargain basement finds and I was so sorry I chose that fabric. Hmmm…could be a mental issue…but I digress. Like I said….just my two (or maybe more) cents!
PS I am very excited to see your progress with this DVD set.
Paula DeGrandsays
Ah yes–I neglected to mention that this tweed is going to be my test piece. I also didn’t mention–because I didn’t want to be overconfident or anything–that my idea is to follow up immediately with a second rendition in a nicer fabric, when I should be able to do a better, faster job. So is the plan. (And the plan is to do the same in round 2 with the “new school” method.) I entirely agree about using good fabric. Actually, the tweed looks better in person than on screen.
I’m so excited for you! I can’t wait to hear what you think of your tailoring supplies, as I’m sure having the right equipment/notions will make this process all the more enjoyable. Happy (hand) sewing!
Trackbacks
[…] covering tailoring materials in disc 1 of Smart Tailoring, Kenneth King moves on to tailoring […]
[…] Watching Smart Tailoring, I thought it would be both instructive and fun to sew jackets following Kenneth King’s “old school” and “new school methods.” I am gathering my materials […]
[…] gathered my materials and tools for making my 1941 McCall “Misses’ Mannish Jacket” following the […]


You will LOVE that basting thread! (yes, I did buy two spools) 🙂
Ambitious!
Steinlauf and Stoller is an excellent source of tailoring materials. http://www.steinlaufandstoller.com/ So is a recent discovery, Bias Bespoke. https://www.etsy.com/shop/BiasBespoke I recently bought Italian basting cotton from them, among other things. They have a variety of canvasses. Lichtenstein on Delancey Street sells wigan.
In March, a new edition of the classic book on tailoring by Roberto Cabrera is due out. I can’t wait for the reviews. Unfortunately, it’s quite expensive.
http://www.amazon.com/Classic-Tailoring-Techniques-Menswear-Construction/dp/1628921706/ref=sr_1_1?s=books&ie=UTF8&qid=1423849677&sr=1-1&keywords=roberto+cabrera+tailoring+2015
“‘New school’ is a method that I developed myself because I needed to be able to make a really well constructed garment that was beautifully shaped and held its line indefinitely.”
So is he suggesting that old school methods don’t produce beautifully-shaped, long-lasting garments? Arrogant. If he’d said he couldn’t as a business person devote the same amount of time to that level of work because he couldn’t charge for it, I’d be more inclined to agree.
Here’s an example of a jacket made with Savile Row methods that is beautiful and inventive:
http://davidetaub.blogspot.nl/2015/01/bespoke-mens-curved-seam-jacket-in.html
Your jacket looks nice, but a block-fused tailored jacket won’t look the same way as a jacket with structure made by hand, wholly or partially; the jacket can’t be steamed and molded as real hymo and horsehair can. I don’t think the glue can be removed from the canvas. I’d sell it or use it as interfacing for accessories if it’s strong enough.
Thank you for mentioning these great sources of materials and inspiration. I was just looking at the Steinlauf and Stoller website and could find just one canvas offered online. (I’m sure they have a wide choice of tailoring canvases in the store, which I’ll check out the next time I’m in New York.)
Bias Bespoke looks great. I’ll keep them in mind for sure.
I have marked my calendar for Cabrera’s book. I’ll be interested to see how clear the construction processes are to a nonprofessional like me.
I would not presume to speak for Kenneth King, but feel safe in saying that any technique he uses in his work and teaches to FIT students, professional and amateur sewers has to meet a high standard. In the introduction of his book Designer Techniques: Couture Tips for Home Sewing (1996) he writes
The Davide Taub jacket is gorgeous, marvelous! I see he won a Golden Shears award a few years back. What remarkable skill and eye. Oh, I just noticed he’s head cutter at Gieves and Hawkes. Perhaps I had a glimpse of him or his work last year. I’ve just become the newest subscriber to his blog.
I should note that in the Fashion and Textile Museum class I took in London last year we were sent to look at Sir Thom Baker, http://tombakerlondon.com/, to try to determine his “house style,” and there’s nothing staid about his work!
I agree with you about my jacket. Although it does look fine, I have a different feeling about it knowing the fabric is fused to that canvas and can’t move. If I keep that fusible it won’t be used for garments.
My two cents….you already are displaying tremendous skill and patience….why not splurge and work on some fabulous fabric? Or is the tweed here just a practice piece? Although I’m thinking that anything you do will be gorgeous so why not go for broke on the fashion fabric? I speak from experience here. As many times my best work was done on my bargain basement finds and I was so sorry I chose that fabric. Hmmm…could be a mental issue…but I digress. Like I said….just my two (or maybe more) cents!
PS I am very excited to see your progress with this DVD set.
Ah yes–I neglected to mention that this tweed is going to be my test piece. I also didn’t mention–because I didn’t want to be overconfident or anything–that my idea is to follow up immediately with a second rendition in a nicer fabric, when I should be able to do a better, faster job. So is the plan. (And the plan is to do the same in round 2 with the “new school” method.) I entirely agree about using good fabric. Actually, the tweed looks better in person than on screen.
I’m so excited for you! I can’t wait to hear what you think of your tailoring supplies, as I’m sure having the right equipment/notions will make this process all the more enjoyable. Happy (hand) sewing!