Readers,
Yesterday I sewed the facings to my jacket fronts, in my Smart Tailoring with Kenneth King project.

I had fun with the process and like the results.

Here’s what Kenneth covered in the lapel, old school segment of this DVD set.

To prepare the facing, you mark the stitching line along the top from the notch point to the shoulder. Kenneth chalked in the line on his wool flannel. I marked my tweed with contrast thread.

Then you stretch along that line–gently–and press in the seam allowance.
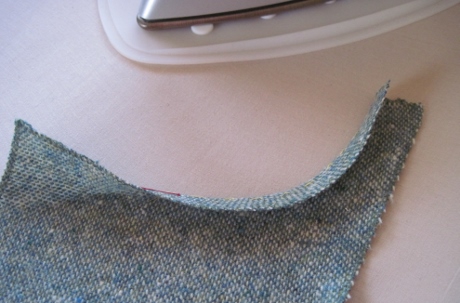

Then you pin the facing to the front, aligning raw edges, matching the notch point and break line at the top.

At the bottom you make sure the facing extends the amount of the seam allowance beyond the fold line of the front hem.

(A quibble: Kenneth has been assuming a 5/8 inch seam allowance, since that’s standard on today’s commercial patterns, but seam allowances vary. My pattern from 1941 uses a 1/2 inch seam allowance. Quite a few of the viewers of this DVD set will be using nonstandard seam allowances. Whenever Kenneth says 5/8 inch I figure that will mean 1/2 inch for my pattern. We now return to our regularly scheduled program.)
Kenneth directs you to pinch out about 1/4 inch ease in the facing and pin it. (In Jackets for Real People by Pati Palmer and Marta Alto this is called a “tailor’s blister,” which sounds like something to avoid.) I dutifully did this, but honestly, I don’t understand the purpose.

Yes, the books say for the turn of cloth, but I need to be persuaded. The question pile for Kenneth’s workshop in July just got bigger.
Now that you’ve pinned the facings in place you then hand baste them in place and take out the pins. If I’d read these instructions in a book or magazine I’d wonder if this was excessive fussiness. But when Kenneth demoed hand basting the seam, explaining that when you’re at the machine you won’t be dodging pins and sewing crooked, I was convinced.
I continue to enjoy the hand work, particularly as Kenneth explains all along the way why it’s worthwhile–for greater control and accuracy. The more I understand the purpose of each tailoring step, and see the superior results, the more control I feel, and–surprise–the more fun I have making jackets and coats.

The next step is to machine-stitch the facings to the fronts.
The object is to stitch right next to (not through) the bias binding that’s the bridge between the canvas interfacing and the fashion fabric front. You have the benefit of the interfacing providing body and support without the bulk in the seam.
You can stitch right next to the binding provided that it is in exactly the right place–a hair’s breadth outside the seam allowance.
But as I noted in Setting the Roll Line, Part 1, I balked at an instruction to trim a seam allowance that had seemingly grown after I pad stitched the canvas to the front. What if I trimmed the seam allowance on one lapel, but the other lapel needed no trimming? Farther down the road, would the jacket be a little asymmetrical–would the lapels be different widths?
Were these valid questions or was I treading in neurotic sewing territory? I played it safe and didn’t trim.

The consequence was that in some places the canvas was about 1/4 inch away from the stitching line. I could not use the edge of the canvas as my guide. I used the guidelines on the throat plate and foot to sew a 1/2 inch seam.

Onward.
The next steps were very familiar anyone who’s tailored a jacket:
- Shortening the stitch length around the point for added strength

I maintained a 1/2 inch seam allowance. Along the top the stitching was just next to the bound canvas (ideal). Along the side the canvas is about 1/4 inch away from the 1/2 inch seamline (not ideal). - Grading the seams differently above and below the break line

The 0.5 stitch length around the corner allowed me to grade very close. - Staggering the clips around the curve so as not to weaken the seam

Staggering the clips around the curve. 
Trimming the staggered clips to further reduce bulk. - Using a point turner to–turn the point (what else?)
- Pressing in the turn of cloth above and below the break line

Pressing open the curved seam using the tailor board. - Basting the pressed edges so the turn of cloth will not be disturbed in future steps.

Basting the front edge and lapel preserves the turn of cloth that was pressed in.
Finally, Kenneth has you catch stitch the facing to the canvas for the time being, till the lining is installed.


This segment had enough that was new (like stitching next to the canvas) to keep me paying close attention. It also had enough that was familiar (like grading and pressing) to let me relax a little and enjoy the process.
By the way, on a weekend trip to Cleveland I got to visit Janie’s Sewing Corner, where Kenneth will be teaching his old school/new school techniques in July. Janie has some very beautiful and inspiring fabrics, like Italian wools, coatings, stretch denims, batiks, and gorgeous knits.

I continue to miss Treadle Yard Goods in St. Paul, Minnesota, where I was a customer for 25 years. It was nice to be in an independent fabric store again.
I asked Janie, “Kenneth doesn’t teach in very many places across the country. I was surprised to find he would be teaching in Cleveland. How did you manage to get him?”
“I asked!” she replied.

Obviously, it pays to ask. And this is not his first visit to Janie’s Sewing Corner, either.
At the Original Sewing and Quilt Expo I attended in Cleveland the day before, a woman told me she’d attended a couple of classes Kenneth had taught at Janie’s. She said how much she’d learned and enjoyed.
After talking with this fellow sewer and visiting Janie’s I’m looking forward to Kenneth’s class all the more. But the learning and enjoying have already begun.

Related Posts
This process you are showing us is ENTHRALLING. Thank you so much for your exquisitely clear descriptions of every step, and the photographs that are perfect illustrations. I’m learning from you as if you were a master teacher [I wouldn’t surprised to learn that you use your teaching skills in a professional endeavor outside the sewing room.]. I deeply appreciate your time and energy.
Thank you, Marilyn! If I ran the world there would be Academy Awards given out for instructional videos and Kenneth King would get one for Smart Tailoring.
I have done some teaching, but mostly I’ve been a student–the kind who sometimes makes a pest of herself for asking SO MANY QUESTIONS!